Monday, January 31, 2011

Linux -- Directory Stack

I am just surprised at the way Data Structures are used in our day-today life not just the computers field. Now, its time to discuss the directory stack. The basic idea of stack is also applied to the directory stack, a list of recently-visited directories. Like any other stack, the directory stack also allows us to view the contents of stack, push an element into the stack, pop an element from the stack. But the difference is that the insertion and deletion operations can be done on any element in the stack, not just the top element of the stack.

Push operation is carried upon by the pushd command while Pop operation is carried upon by the popd command. These two operations can quickly navigate around the file-system. If the pop operation is issued when the stack is empty, the appropriate message is issued. The cd command changes the current element at the top of the stack i.e., the $DIRSTACK variable. The dirs builtin displays the contents of the directory stack. The contents of the directory stack are also visible as the value of the DIRSTACK shell variable.

In short, the pushd builtin adds directories to the stack as it changes the current directory, and the popd builtin removes specified directories from the stack and changes the current directory to the directory removed.

The pushd command is similar to the cd command, but pushd retains the directory that you are currently in, in its directory-stack. For example, the command pushd /usr/share displays the entire directory-stack. It knows that I came to /usr/share from the home directory. If I issue popd, this is going to take my directory-stack and bring me back to the previous directory in the directory-stack. The command saves the current directory on the top of the directory stack and then cd to dir. With no arguments, pushd exchanges the top two directories.

The popd command removes the top entry from the directory stack, and cd to the new top directory. When no arguments are given, popd removes the top directory from the stack and performs a cd to the new top directory.

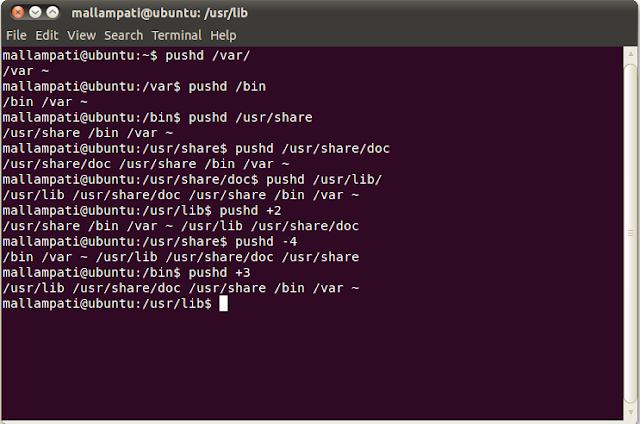
The basic behavior of pushd, popd and dirs are shown in the figure below:


The DIRSTACK array needs some explanation at this point in time. The contents of the array can be displayed by the command "echo ${DIRSTACK[*]}". If only the second element in the array needs to be printed, then "echo ${DIRSTACK[1]}" as the arrays start with index as 0. The DIRSTACK array is shown in the below figure:


Variations of dirs:
dirs [+N | -N] [-clvp]
+N: Displays the Nth directory (counting from the left of the list printed by dirs when invoked without options), starting with zero.
-N: Displays the Nth directory (counting from the right of the list printed by dirs when invoked without options), starting with zero.
-c: Clears the directory stack by deleting all of the elements.
-l:  Produces a longer listing; the default listing format uses a tilde to denote the home directory.
-p: Causes dirs to print the directory stack with one entry per line.
-v: Causes dirs to print the directory stack with one entry per line, prefixing each entry with its index in the stack.

The variations of the dirs command are shown in the below figure:


Variations of pushd:
pushd [dir | +N | -N]
+N: Brings the Nth directory (counting from the left of the list printed by dirs, starting with zero) to the top of the list by rotating the stack.
-N: Brings the Nth directory (counting from the right of the list printed by dirs, starting with zero) to the top of the list by rotating the stack.
dir: Makes the current working directory be the top of the stack, and then executes the equivalent of `cd dir'.

Variations of popd:
popd [+N | -N] [-n]
+N: Removes the Nth directory (counting from the left of the list printed by dirs), starting with zero.
-N: Removes the Nth directory (counting from the right of the list printed by dirs), starting with zero.
-n: Suppresses the normal change of directory when removing directories from the stack, so that only the stack is manipulated.

The variations of pushd and popd are shown in the figure below:


Sources: Bash Reference

Sunday, January 30, 2011

Linux terminal - Mathematics

Important mathematical calculations can be done by using the Calculator application available with the Linux applications. But these calculations and can be made by the following commands in the terminal:
  1. bc
  2. expr
  3. factor
  4. units
1. The "bc" command:
The programmable calculator called bc gets you into the calculator mode, and the $ prompt disappears. The command gives almost all the basic mathematics calculations. The input  to this calculator is taken line by line. Enter an expression and the result supplied in the next line. The inputs and results are self-explanatory. Typing "quit" gets you out of the calculator mode and ends your tryst with bc. The basic mathematical calculations can done using bc command as follows:


One of the useful features of bc is that of a base conversion. The variables ibase and obase are set such that ibase gives the base of the input and obase gives the radix or base of the output number. As shown in the figure below, the number is given in base 10 and the input is converted into base 2.


In addition, bc also supports functions like sqrt, cosine, sine, tangent etc., The trigonometric functions sine and cosine ( s() and c() respectively)would work only when the bc command is used with the -l option. The trigonometric functions expect their arguments in radians not in degrees.


A for loop can also be run in the calculator mode as shown below.


2. The "expr" command:
In addition to bc, the expr command is used for evaluating basic mathematical calculations dealing with only integers. The expr command cannot perform calculations on data other than integers. The operators must be surrounded on both sides by a space. When using * operator, use the backslash ( \ ) for the purpose of escape-sequencing since * operator is a meta-character.


3. The "factor" command:
The factor command takes as input an integer and gives the output all the prime factors of the input; each one is printed the proper number of times. To end it, press Ctrl - D. The command factor when used with the argument as the input, it returns all the prime factors of that number.


4. The "units" command:
The units command is another handy utility, which converts quantities expressed in various standard scales to their equivalents in other scales. It works interactively in this fashion:


Algorithm design --- Iteration, Recursion or Tail recursion

The best method for solving a problem has to be chosen under many circumstances. Techniques such as Greedy method, divide and conquer method, dynamic programming etc., are used to solve the problems under different constraints.

In some cases, the method followed to solve a problem might be easy to program but might not deliver good performance due to more space and time complexities; Recursion is one such example. Recursion is a master technique to solve many complicated problems, but the space and time complexity are higher than those in the conventional program without having the recursion. It is trouble using recursion as there is no portable way to tell how deep recursion can go without causing trouble (how much 'stack space' the machine has), and there is no way to recover from too-deep recursion (a 'stack overflow'). Recursion requires more number of steps to solve a problem.

Iteration can do things faster for us. However, in some problems, using iteration becomes too cumbersome and tedious to be applied especially when the problem is naturally recursive. Thus, the time taken for designing the algorithm and the efficiency of the algorithm must be taken into consideration while devising a method to solve a problem.

If iteration is getting complicated, then you always have the weapon of TAIL RECURSION. With Tail recursion you can get the advantages of recursion while overcoming the defects in the iteration method. Tail recursion is a process of using the function call as the last executed statement in the function definition. Here, we take the return value as one parameter of function itself. We use stack to maintain all the functions but here it will not append new function in stack but it will overwrite the value of previous function with the current one. Thus, the function call time and stack implementation time will be reduced giving better performance.

Let us solve the problem of finding factorial of a number using these three methods:

CASE 1: Using Iteration:
int factorial ( int no){
         int i, fact=1;
         for (i=no; i>1; i--)
                fact=fact*i;
         return fact;
}

CASE 2: Using Recursion:
int factorial ( int no) {
        int fact=1;
        if (no > 1)
               fact=no * factorial (no - 1);
        return fact;
}
This process is implemented in stack as-

CASE 3: Using Tail Recursion:
int factorial ( int n, int fact)
{
             if ( n==1 )
                    return fact;
             else
                    factorial ( n-1, n*fact);
}

This will be implemented in stack as-


Here, the tail recursion takes only 4 steps for getting factorial of number 4. It reduces both space and time and improves the performance.

References: "Data Structures Through C" By S.K. Srivastava.

Friday, January 14, 2011

MacBuntu and Compiz effects --Make Ubuntu look like Mac OSX

After a long gap, I have something interesting for you. The first part is to make Ubuntu look like Mac OS-X and the next part giving you some of the very interesting features of Compiz which I tried.

Unlike the earlier editions of Ubuntu which had a very dry default theme, the latest versions 10.04 and 10.10 have an interesting theme by default. Ubuntu must have definitely looked into this aspect and the booting process. The booting process is so fast that it takes hardly 20 seconds for the booting to take place. On the other hand, the Internet speed also has increased reasonably well over the Lucid Lynx (which had disastrously slow Internet). However, the look and feel of Mac-OS is top-class with glossy finishes and high resolutions.


How to make Ubuntu look like Mac OS X:


In order to get the Mac look-and-feel, a package named "Macbuntu" has to be installed. The process for the installation is given below:
  1. Download the Macbuntu package from the links given below:
    • https://downloads.sourceforge.net/project/macbuntu/macbuntu-10.04/v2.2/Macbuntu-10.04.tar.gz for Lucid Lynx (Ubuntu 10.04).
    • https://downloads.sourceforge.net/project/macbuntu/macbuntu-10.10/v2.3/Macbuntu-10.10.tar.gz for Maverick Meerkat (Ubuntu 10.10).
  2. After changing the present working directory to the folder which contains the downloaded file, extract the contents inside this compressed file to /tmp folder by using the following commands in the Terminal:
    • tar xzvf Macbuntu-10.10.tar.gz -C /tmp
    • cd /tmp/Macbuntu-10.10/
    • ./install.sh
  3. In the steps that follow the installation, give the  appropriate values to the questions at each stage.
  4. Now restart your system to get the new look-and-feel of Mac OS.


Compiz Settings:


Getting to the later part of the discussion,  Compiz effects are something that anyone would like to have for better animations, extras, effects, Window management, Utility, Desktop effects etc.

The things I tried in Compiz are pretty easy ones and Desktop cube, cube reflection and deformation, Scale and Negative are the ones that I predominantly used. 

The negative  plug-in does get the negative version of the environment which we are working on. 


The Scale plug-in gives a list of all the windows maximised at the center of the screen just giving some amazing desktop eye candy as shown in the figure below. It is always handy to have these kinds of plug-ins.


The Wobble windows plug-in though is a good piece, seemed to be an unstable one as far as the look in the environment and the wobbling to the eyes are concerned. Among the others, all the plug-ins related to Cube are a treat to the eyes. But one should see that the performance does not get disappointed when you have an extra set of these animations enabled. Cube Atlantis and Cube gears are master-pieces in this section but demand very good hardware all around.

A balance between the performance and the look-and-feel  is the one we should look at because an operating system is not solely about the look-and-feel. Therefore, it is always recommended to think for a while before switching to high graphic oriented plug-ins.
Related Posts Plugin for WordPress, Blogger...